I recently purchased a new Ubuntu server for my startup. Here's a concise guide, taking about 5 minutes, to set it up.
Setting up a new server can be quite rewarding. Following these steps, your server will be ready to host a web app created with Node.js and Nginx, and it can synchronize with your existing repository if necessary.
First, let's update the apt package list by running:
1sudo apt update
Enable essential ports
In your provider’s panel, enable these ports:
- 80 for http
- 443 for https
- 22 for ssh
Install Nginx
Execute the command below to install Nginx, a popular web server:
1sudo apt install nginx
To verify the Nginx service status, use:
1systemctl status nginx
A successful installation will display output similar to this:
1nginx.service - A high performance web server and a reverse proxy server
2     Loaded: loaded (/lib/systemd/system/nginx.service; enabled; vendor preset: enabled)
3     Active: active (running) since Sun 2023-11-19 10:20:28 CST; 10min ago
4       Docs: man:nginx(8)
5   Main PID: 17963 (nginx)
6      Tasks: 3 (limit: 1939)
7     Memory: 3.8M
8        CPU: 31ms
9     CGroup: /system.slice/nginx.service
10             ├─17963 "nginx: master process /usr/sbin/nginx -g daemon on; master_process on;"
11             ├─17964 "nginx: worker process" "" "" "" "" "" "" "" "" "" "" "" "" "" "" "" "" "" "" "" "" "" "" "" "" "" "" ""
12             └─17965 "nginx: worker process" "" "" "" "" "" "" "" "" "" "" "" "" "" "" "" "" "" "" "" "" "" "" "" "" "" "" ""
Install Node framework
Run these commands to install Node.js and npm:
1sudo apt install nodejs
2sudo apt install npm
3
4npm install yarn --global #Optional
Verify the installations with:
1node -v
2npm -v
To update Node.js (recommended to version 16 or later), execute:
1sudo npm install -g n
2sudo n stable # This will automatically install the latest stable version of node
Install Git
Run this command if git not installed.
1sudo apt install git
Next, let’s generate the ssh key. Skip this step if you do not need to work with your remote repo on this server.
1ssh-keygen -t ed25519 -C "your_email@example.com"
Retrieve the public key with:
1cat /root/.ssh/id_ed25519.pub
2# or
3vim /root/.ssh/id_ed25519.pub
Add this key to your GitHub account under SSH keys settings.
Install PM2
To manage our process we can use PM2.
1npm install pm2 -g
Now you can start your project. Switch to your projecy directory, and run:
1pm2 start yarn --name "ygeeker-website" -- start
Replace “yarn” and second “start” with your actuall command.
Config Nginx & SSL
⚠️ Note: Replace 'ygeeker.com.cn' with your domain.
Create the Nginx configuration file:
1sudo nano /etc/nginx/sites-available/ygeeker.com.cn
Type in the website config:
1server {
2    listen 80;
3    listen [::]:80;
4    server_name ygeeker.com.cn;
5
6    root /var/www/ygeeker.com.cn/html;
7    index index.html;
8
9    location / {
10        try_files $uri $uri/ =404;
11    }
12}
13
14server {
15    listen 80;
16    listen [::]:80;
17    server_name www.ygeeker.com.cn;
18
19    location / {
20        proxy_pass http://localhost:3000;
21        proxy_http_version 1.1;
22        proxy_set_header Upgrade $http_upgrade;
23        proxy_set_header Connection 'upgrade';
24        proxy_set_header Host $host;
25        proxy_cache_bypass $http_upgrade;
26    }
27}
Create a symbolic link to enable this configuration:
1sudo ln -s /etc/nginx/sites-available/ygeeker.com.cn /etc/nginx/sites-enabled/
It’s not recommended to directly create config file under sites-enabled directory.
To dive deeper about symbolic link on Linux you could read Understanding Linux Kernel.
1sudo snap install --classic certbot
2sudo certbot --nginx -d <your_domain> # Generate Certificate
Ensure DNS settings are correctly configured to point to your server.
For more on Certbot, visit this page.
Use Github action for automention
We’ll create a github action to let the production always use latest code from master branch. Let’s start with writting github action file.
Create a sync-to-server.yml under .github/workflows
1name: Sync to Server
2
3on:
4  push:
5    branches:
6      - main
7
8jobs:
9  deploy:
10    runs-on: ubuntu-latest
11    steps:
12      - name: SSH and deploy node app
13        uses: appleboy/ssh-action@master
14        with:
15            host: ${{ secrets.SSH_HOST }}
16            username: ${{ secrets.SSH_USERNAME }}
17            password: ${{ secrets.SSH_PASSWORD }}
18            port: ${{ secrets.SSH_PORT || '22' }}
19            fail_on_stderr: true
20            script: |
21                cd /home/app/YGeeker_Website
22                rm -rf yarn.lock
23                git pull origin main
24                yarn --production
25                yarn run build
26                kill $(lsof -t -i:3000)
27                pm2 restart 0 || pm2 start yarn --name "ygeeker-website" -- start
Then enable action for your github repo on this page.
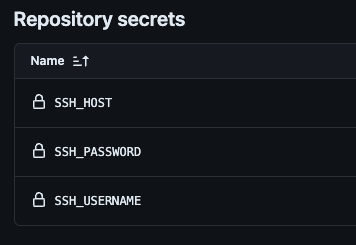
In your github repo, create three environemnt varibles for SSH connection at this page:
Further
To maximize your server’s capabilities, consider:
- Hosting a Jitsi Meet video conference service
- Running a Minecraft server
- Setting up a media streaming service with Jellyfin or Plex
- And more…